How to deploy Marketing Cloud Account Engagement (Pardot) Demo Org
Marketing Cloud Account Engagement (Pardot) is the only platform in the B2B marketing automation space that offers free and unrestricted platform access*. This demo org allows users to learn the ins and outs of the platform. It includes access to all platform capabilities and is ideal for practicing core functions and completing the MCAE30 30-day challenge.
In the following sections, you will find all the information you need to start using your MCAE instance.
Demo Sign-up
Before you start with the provisioning, here are a few tips to prevent issues:
- Ensure to do that with a browser session where you are completely logged out of any CRM/Account Engagement accounts
- Configure with a VALID email address to mitigate password reset and authentication issues.
- Google & O360 email accounts can use the + operator to make multiple development accounts. This will allow you to create unique accounts and perform password resets.
- New Incognito window can be a great idea for that or see instructions for creating a separate browsing profile in chrome
- Another option is to use chrome profiles, which may reduce issues with browser cookies and other log-in issues. Particularly valuable to consultants, which log-in to multiple client accounts: https://support.google.com/chrome/answer/2364824?co=GENIE.Platform%3DDesktop&hl=en
Sign-up Steps
- Complete the sign-up form, making sure to use an active and monitored email address.
- Look for an email from developer@salesforce.com with a subject line “Welcome to Salesforce: Verify your account”
- After receiving the verification email, log in to the instance and set your password.
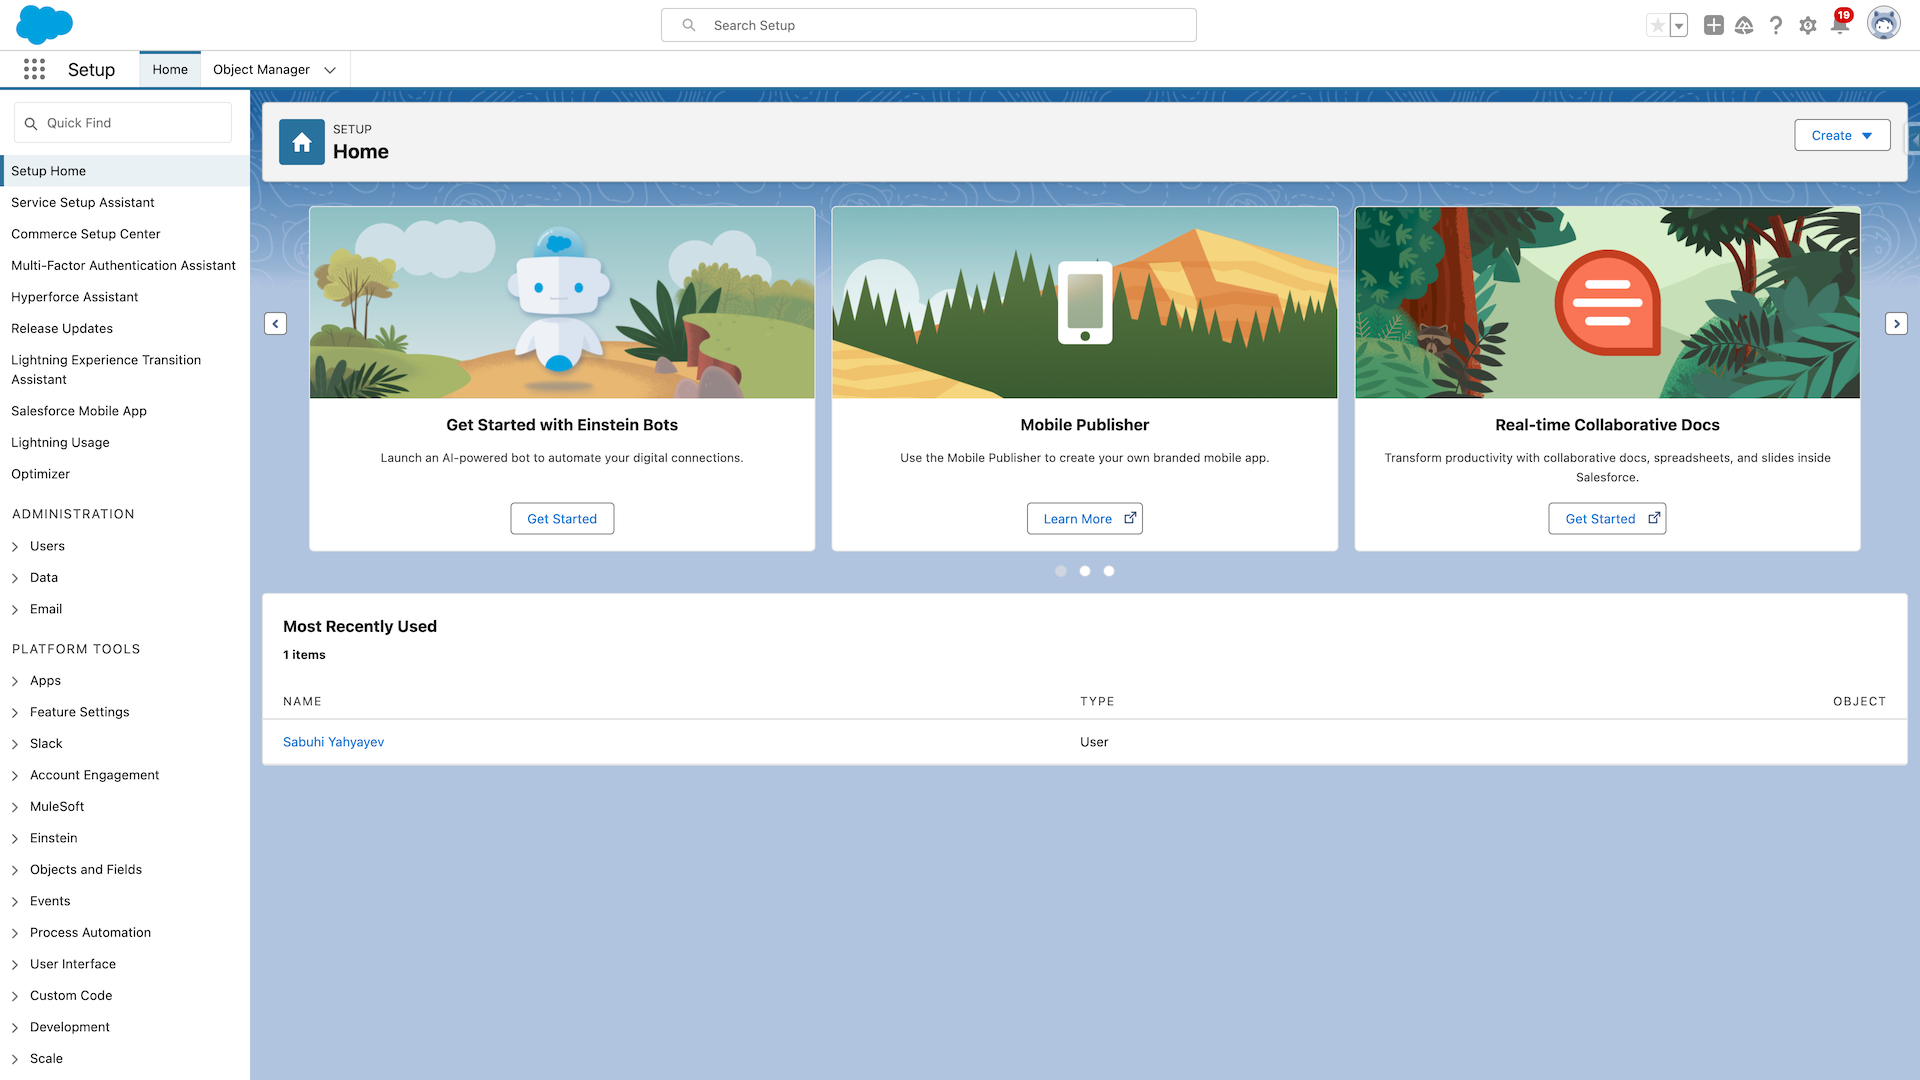
- Your objective is to reach the screen below:
Demo Configuration Instructions
The setup process for the org in Production will be similar to setting up a a demo org, with the exception that certain settings and permissions have already been enabled in the demo instance. Please follow the summarized steps below. For more detailed information, you can refer to the Lightning App Enablement Guide document.
⏱️ Estimated time to complete: 90 minutes if you configure everything (duration may vary depending on individual needs and experience with set-up)
Configuration Steps
- Configure Business Unit and Choose your Admin
- Install the Appexchange Package
- Assign access to the Account Engagement Connected App
- Apply the Account Engagement Connector User permission set
- Update access to Lead and Contact fields for integration user
- Enable Account Engagement Lightning App
- Unpause the Salesforce connector
- Enable Connected Campaigns (optional)
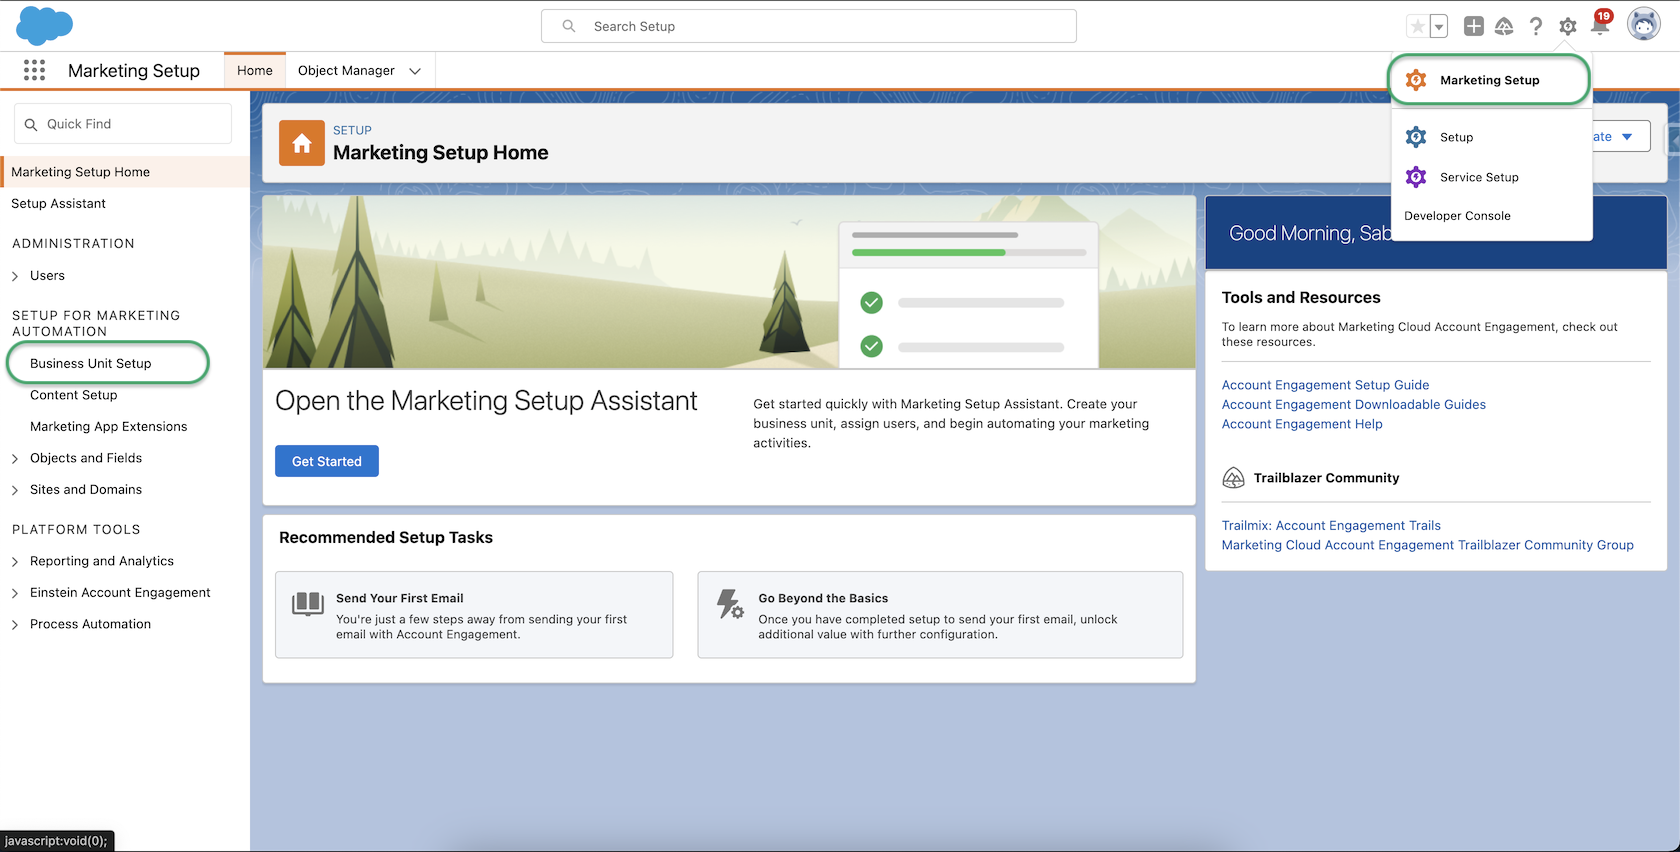
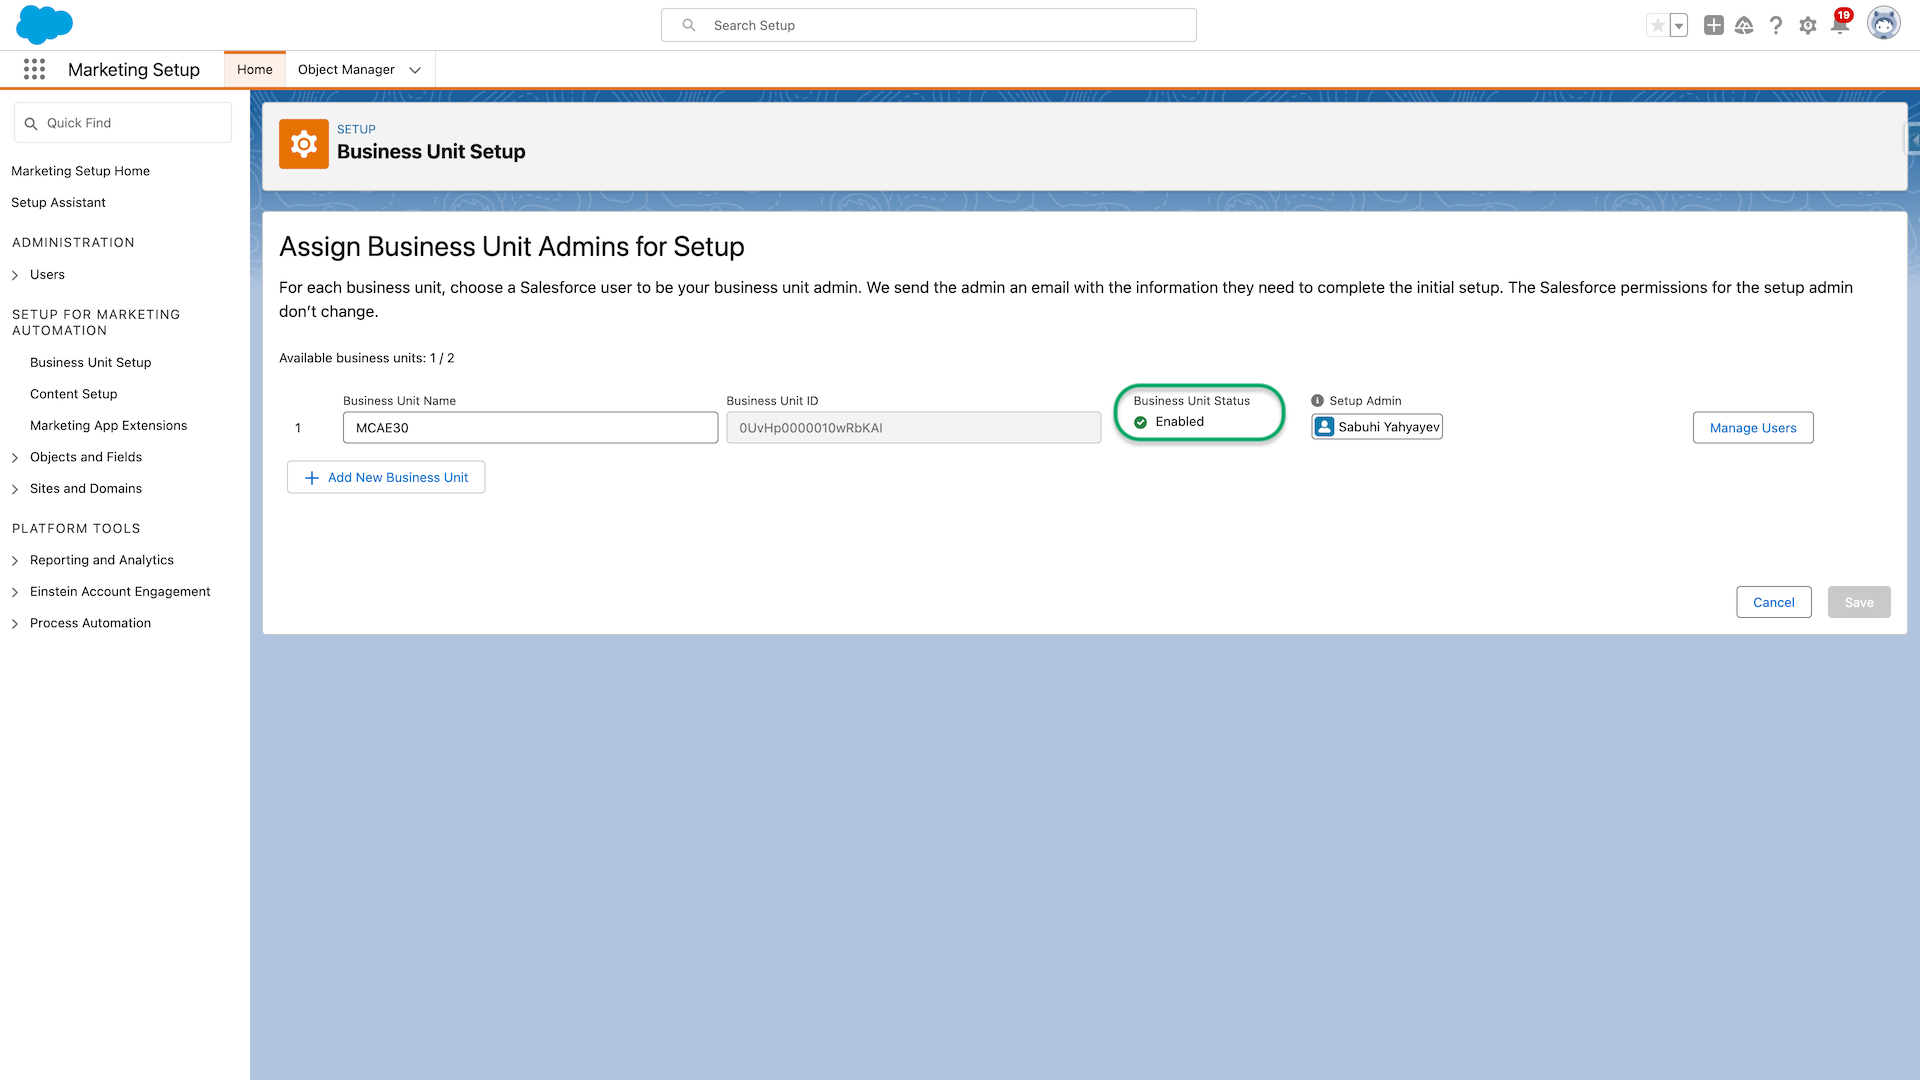
1. Configure Business Unit and Choose your Admin
Login to your demo Org from https://login.salesforce.com and navigate to the Marketing Setup home screen. Next, click on Business Unit Setup under Setup for Marketing Automation section.
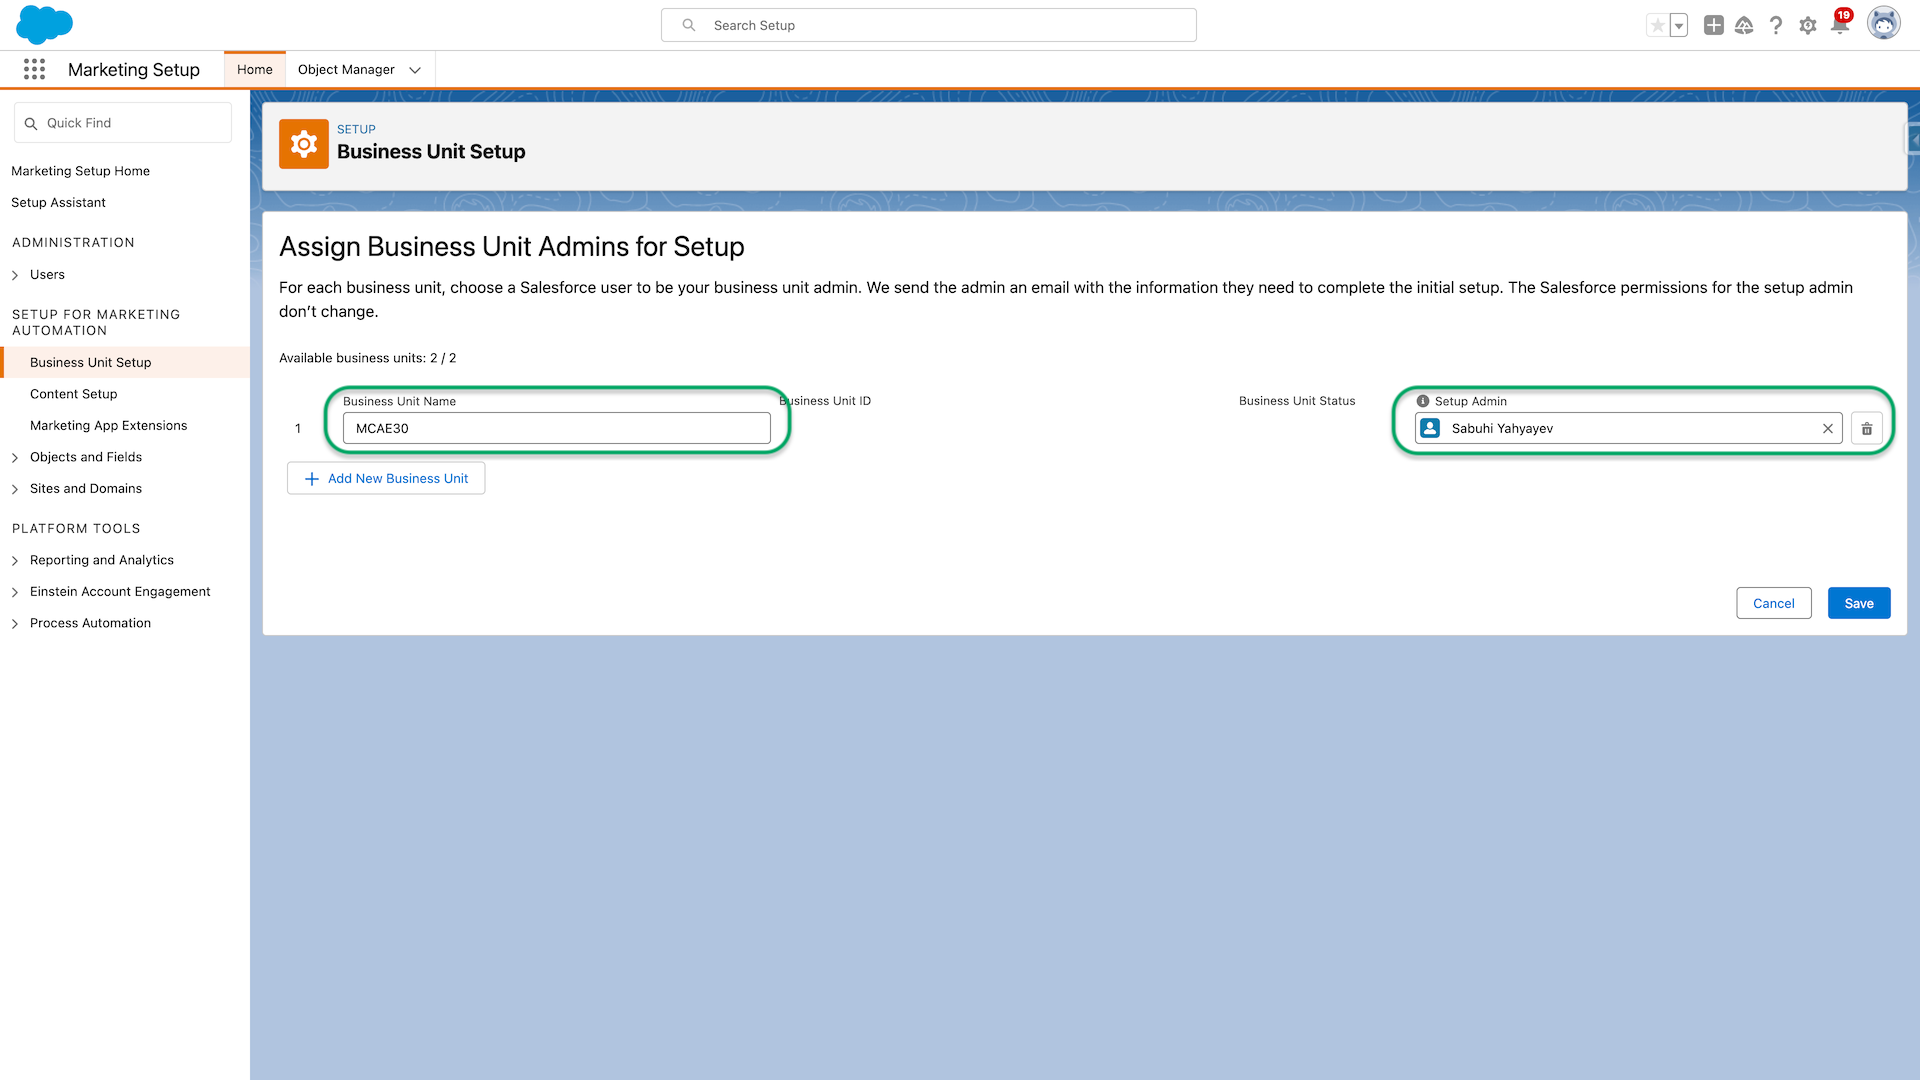
Name your business unit, for example, MCAE30, and then select the user you registered with under Setup Admin. Click Save.
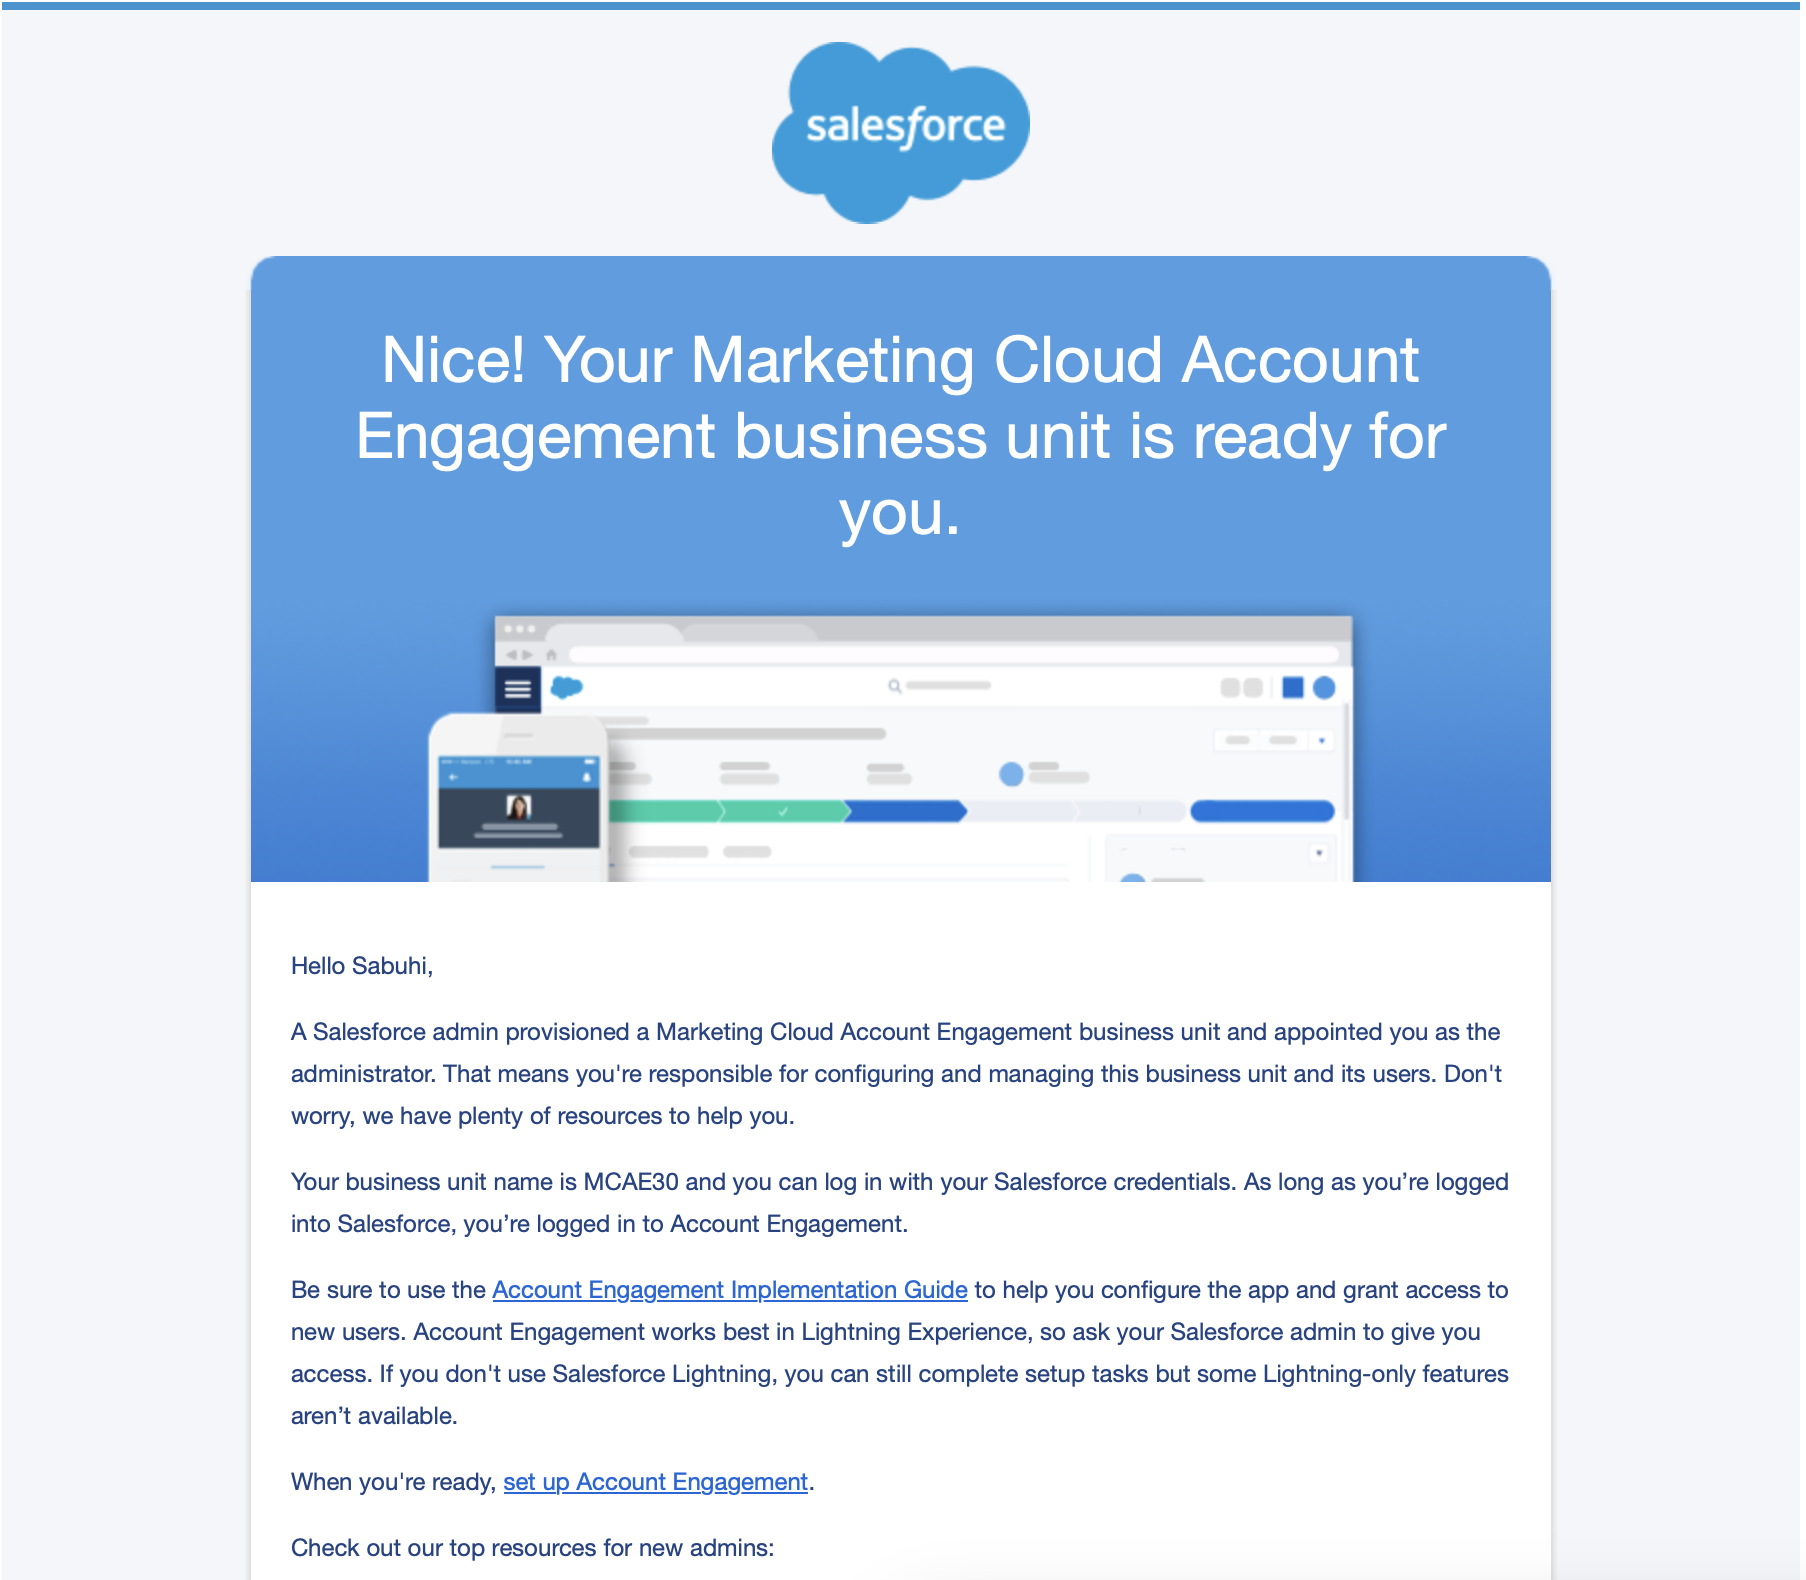
You should receive a confirmation notification on the screen and then email confirming that your MCAE account is now ready:
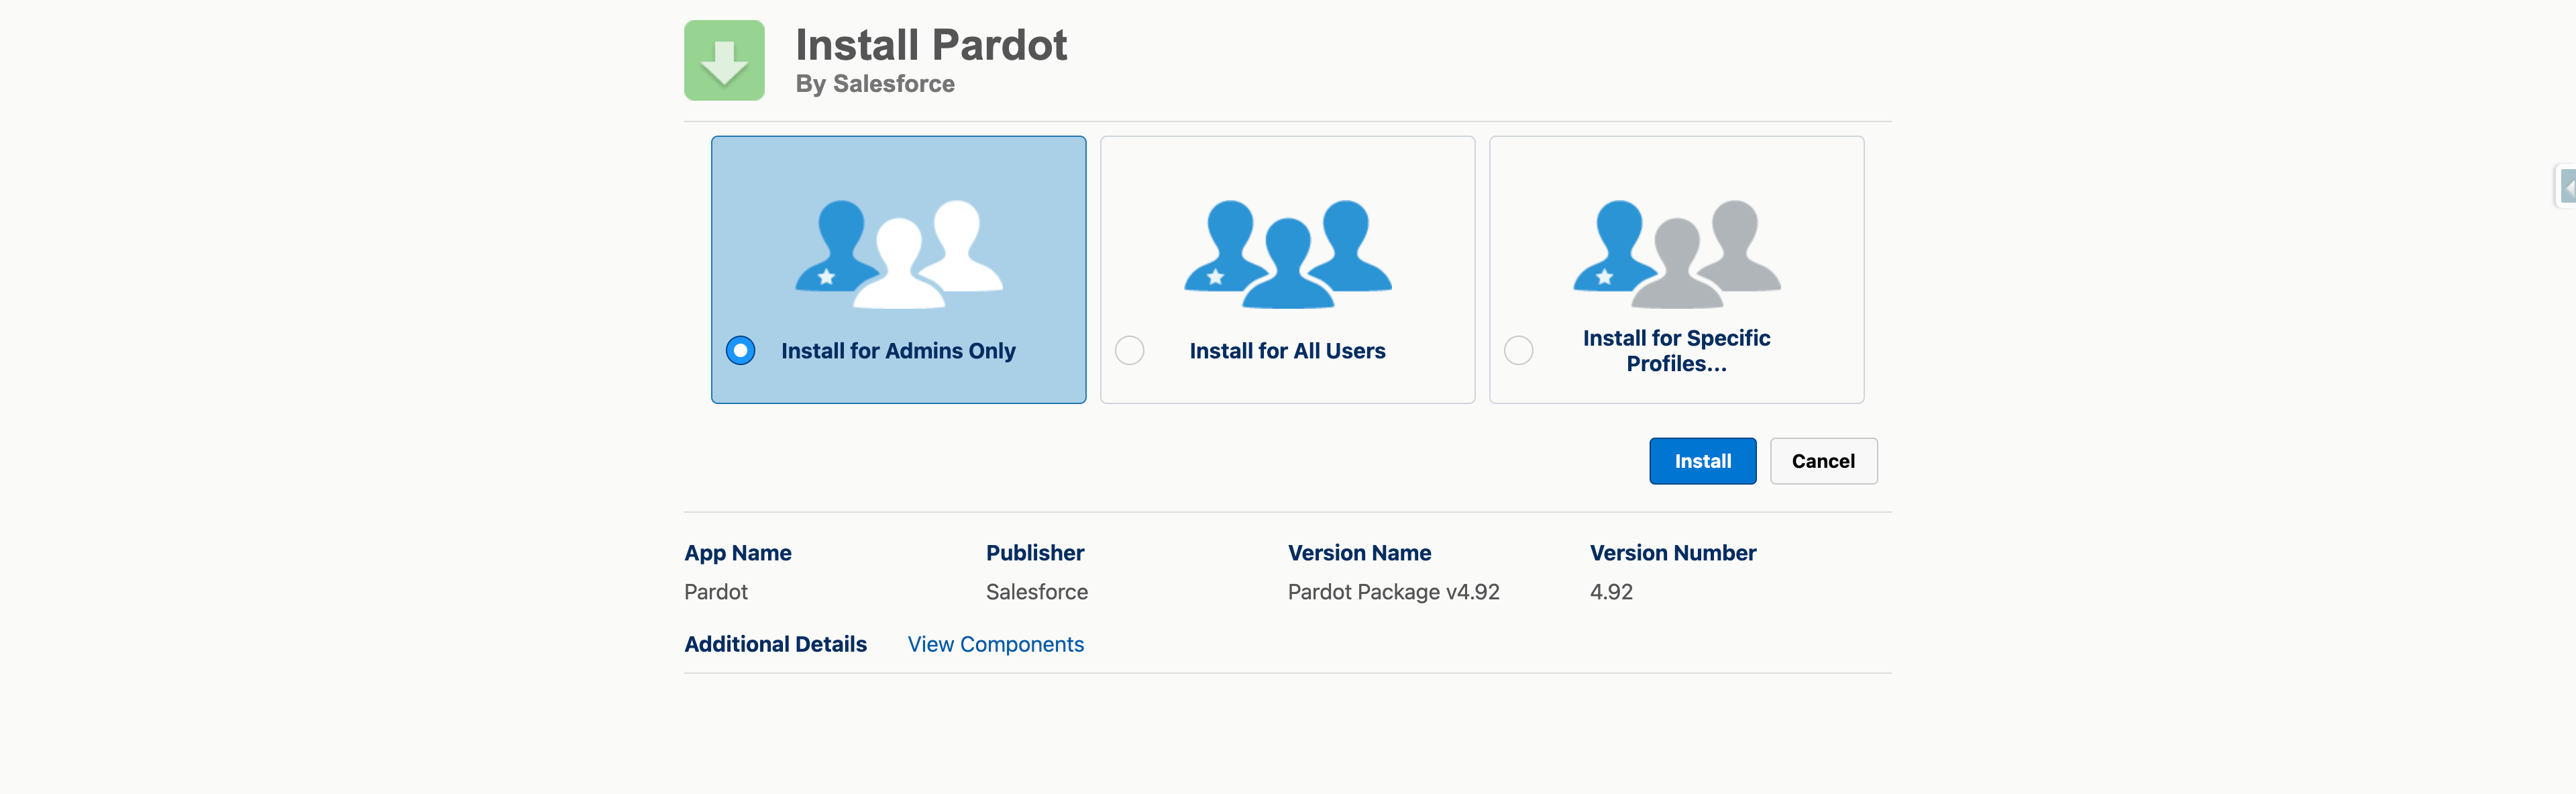
2. Install the Appexchange Package
Navigate to the Marketing Cloud Account Engagement AppExchange Package Download page. In the Installation Links section, click on the link for Production Environments. Keep the Install for Admins option selected, and then click the Install button.
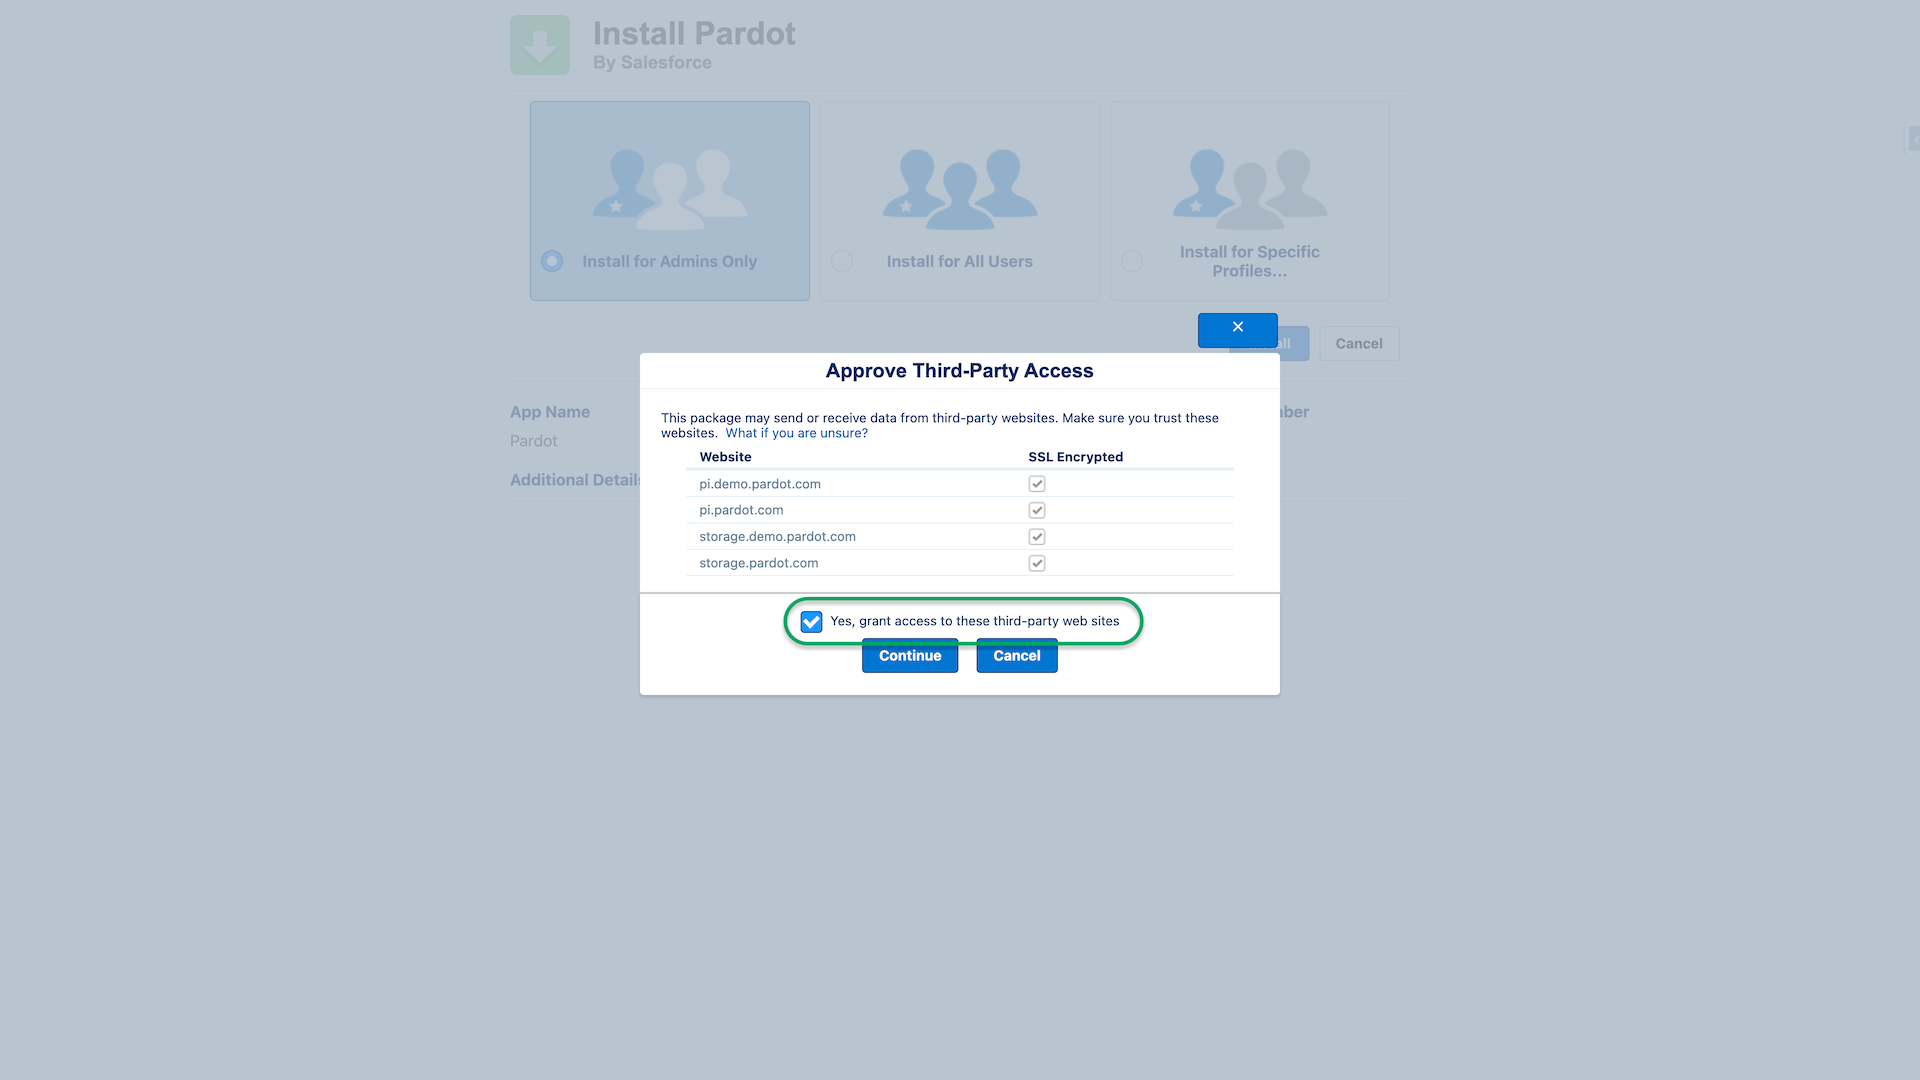
Check Yes, grant access to these third-party web sites and click Continue.
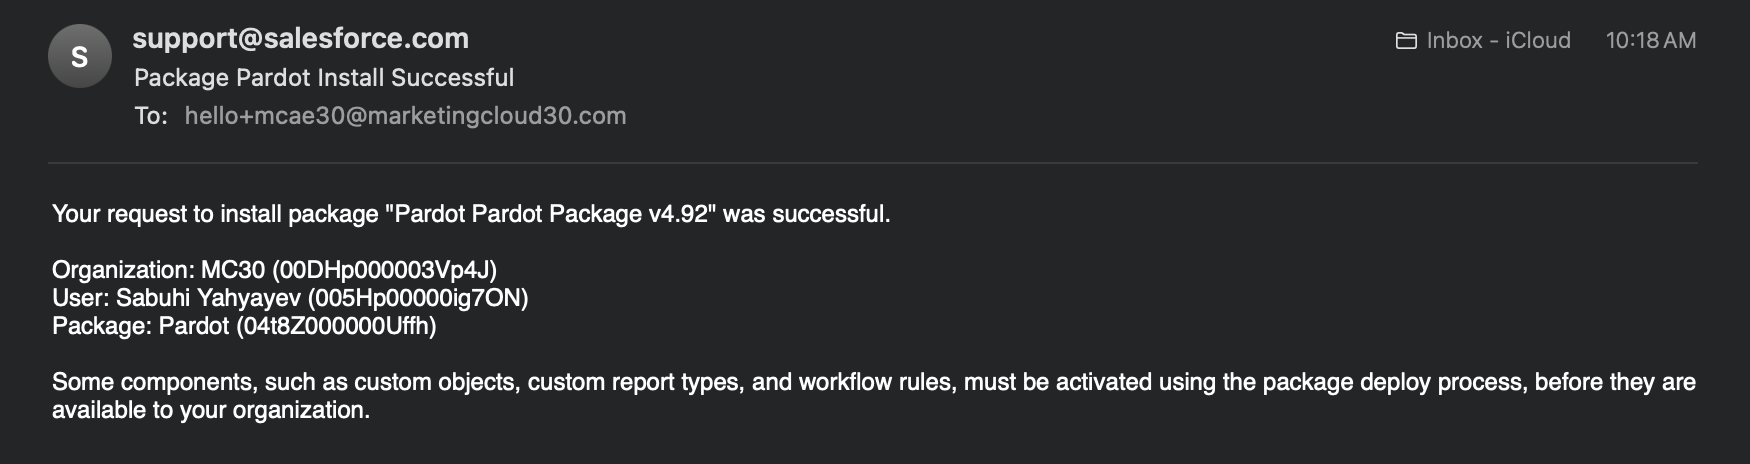
Wait until the installation completes or if a message appears indicating that the installation is taking a long time.

If this is the case please wait until an email confirming completion of installation arrives to you mailbox:
Click Done button to close installation window.
3. Assign access to the Account Engagement Connected App
The Account Engagement Lightning app communicates with Account Engagement through a connected app, which is a feature in Salesforce for connecting applications. Access to the app is controlled by assigning profiles and/or permission sets.
- In Salesforce, go to Setup > Apps > Connected Apps > Manage Connected Apps.
- Click
b2bma_canvas. - Click Manage Profiles
- Verify that System Administrator profile is selected, if it is not ensure to select it and save the assignment.
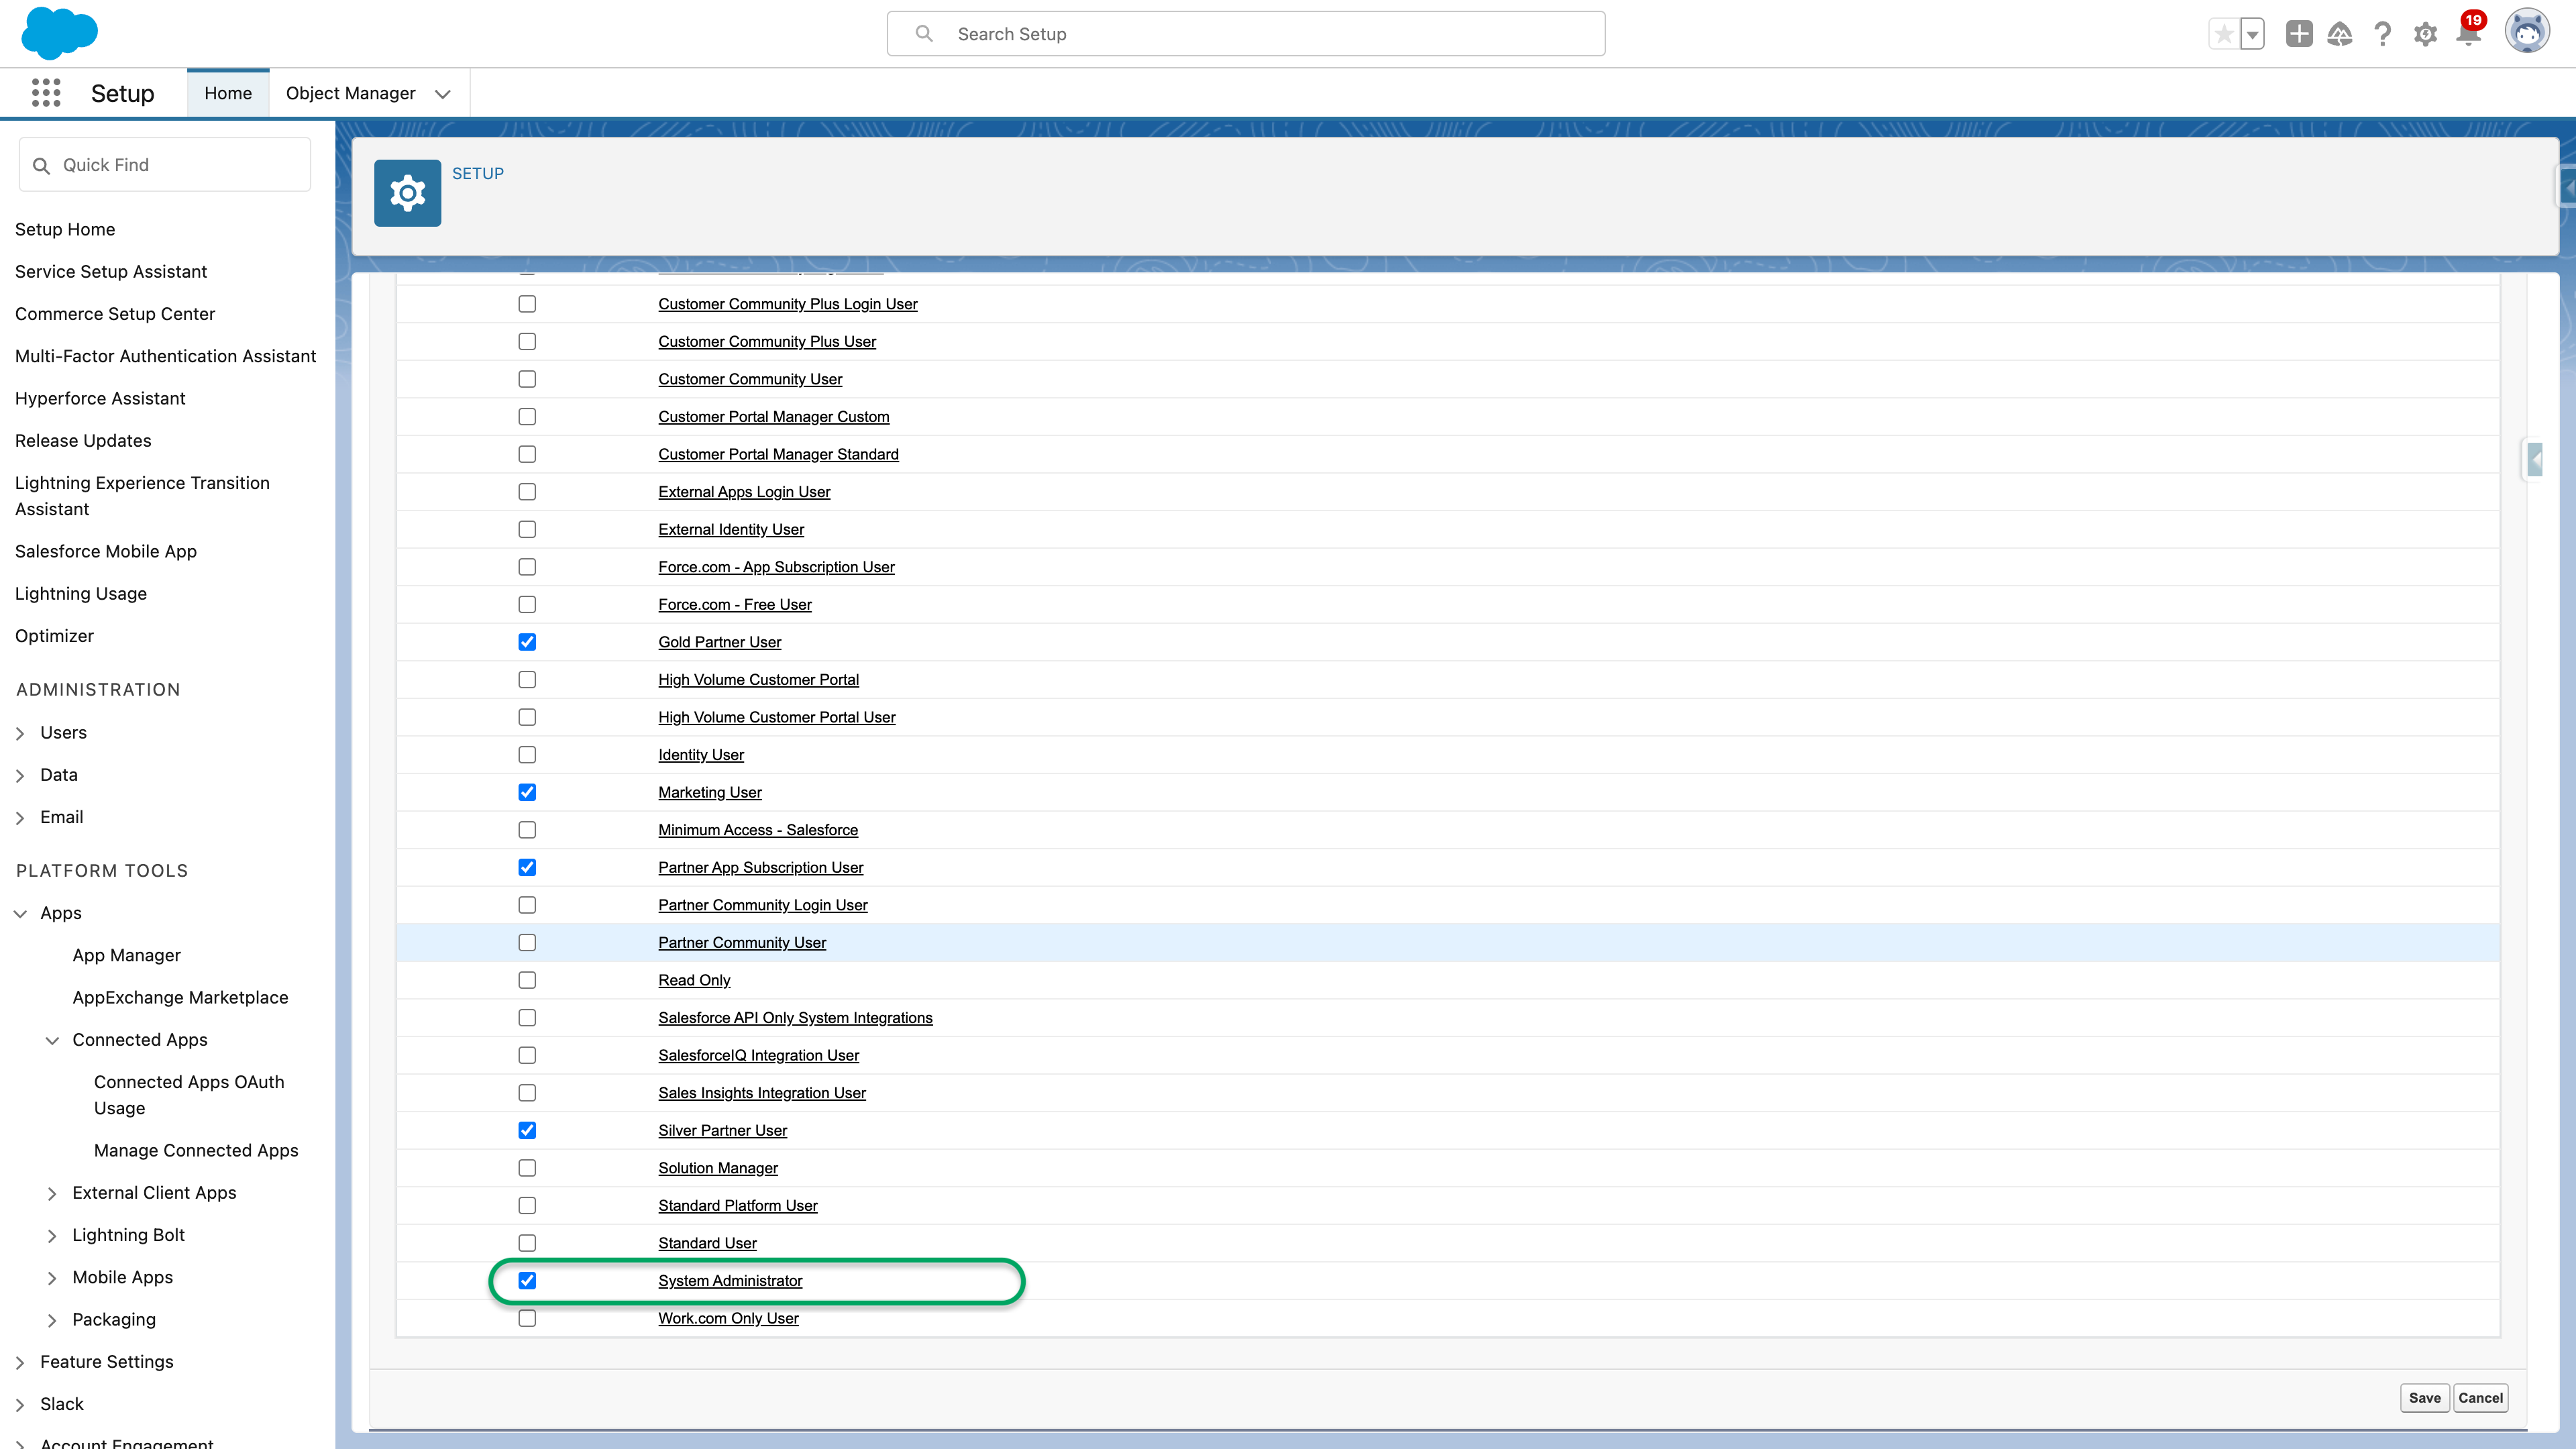
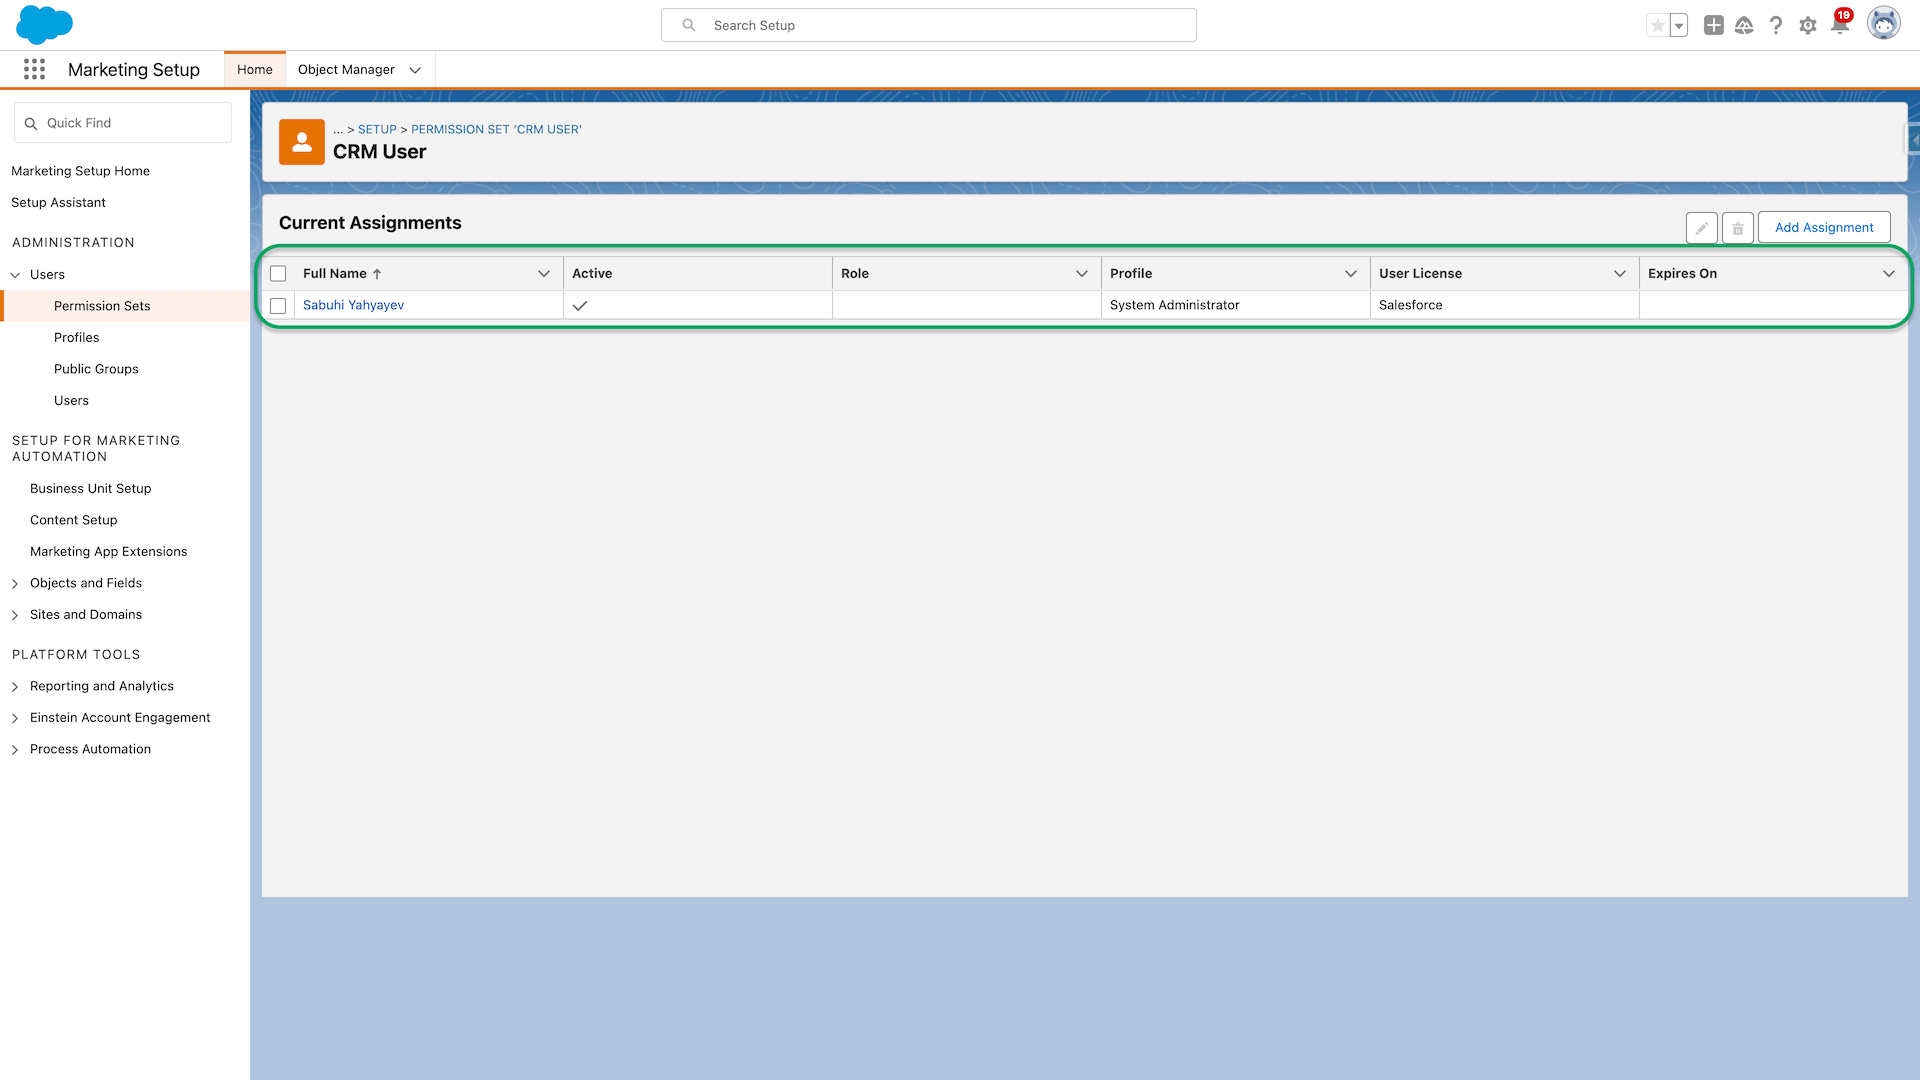
4. Apply the Account Engagement Connector User permission set
Assign the CRM User, Sales Cloud User, or **Service Cloud User** permission set to yourself. For the demo instance, we’ll be using CRM User permission set. Depending on your Salesforce org, you’ll see one or all of these permission sets available by default.
- In Salesforce, go to Setup > Users > Permission Sets.
- Click CRM User
- Click Manage Assignments.
- Click Add Assignments.
- Select your admin user and click Assign and then Done.
5. Update access to Lead and Contact fields for integration user
Default field level security does not allow access to Email Opt Out field for Lead and Contact objects to the integration user configured in our demo account.
- While in Setup under Objects and Fields click on Object Manager
- Locate and click on Contact object record
- Click on Fields & Relationships
- Locate and click on Email Opt Out field
- Click on Set Field-Level Security button
- In the Visible column select checkbox for B2BMA Integration User and System Administrator profiles and click Save
- Return to Object Manager and for the Lead object. (Repeat the same steps the Lead Object)
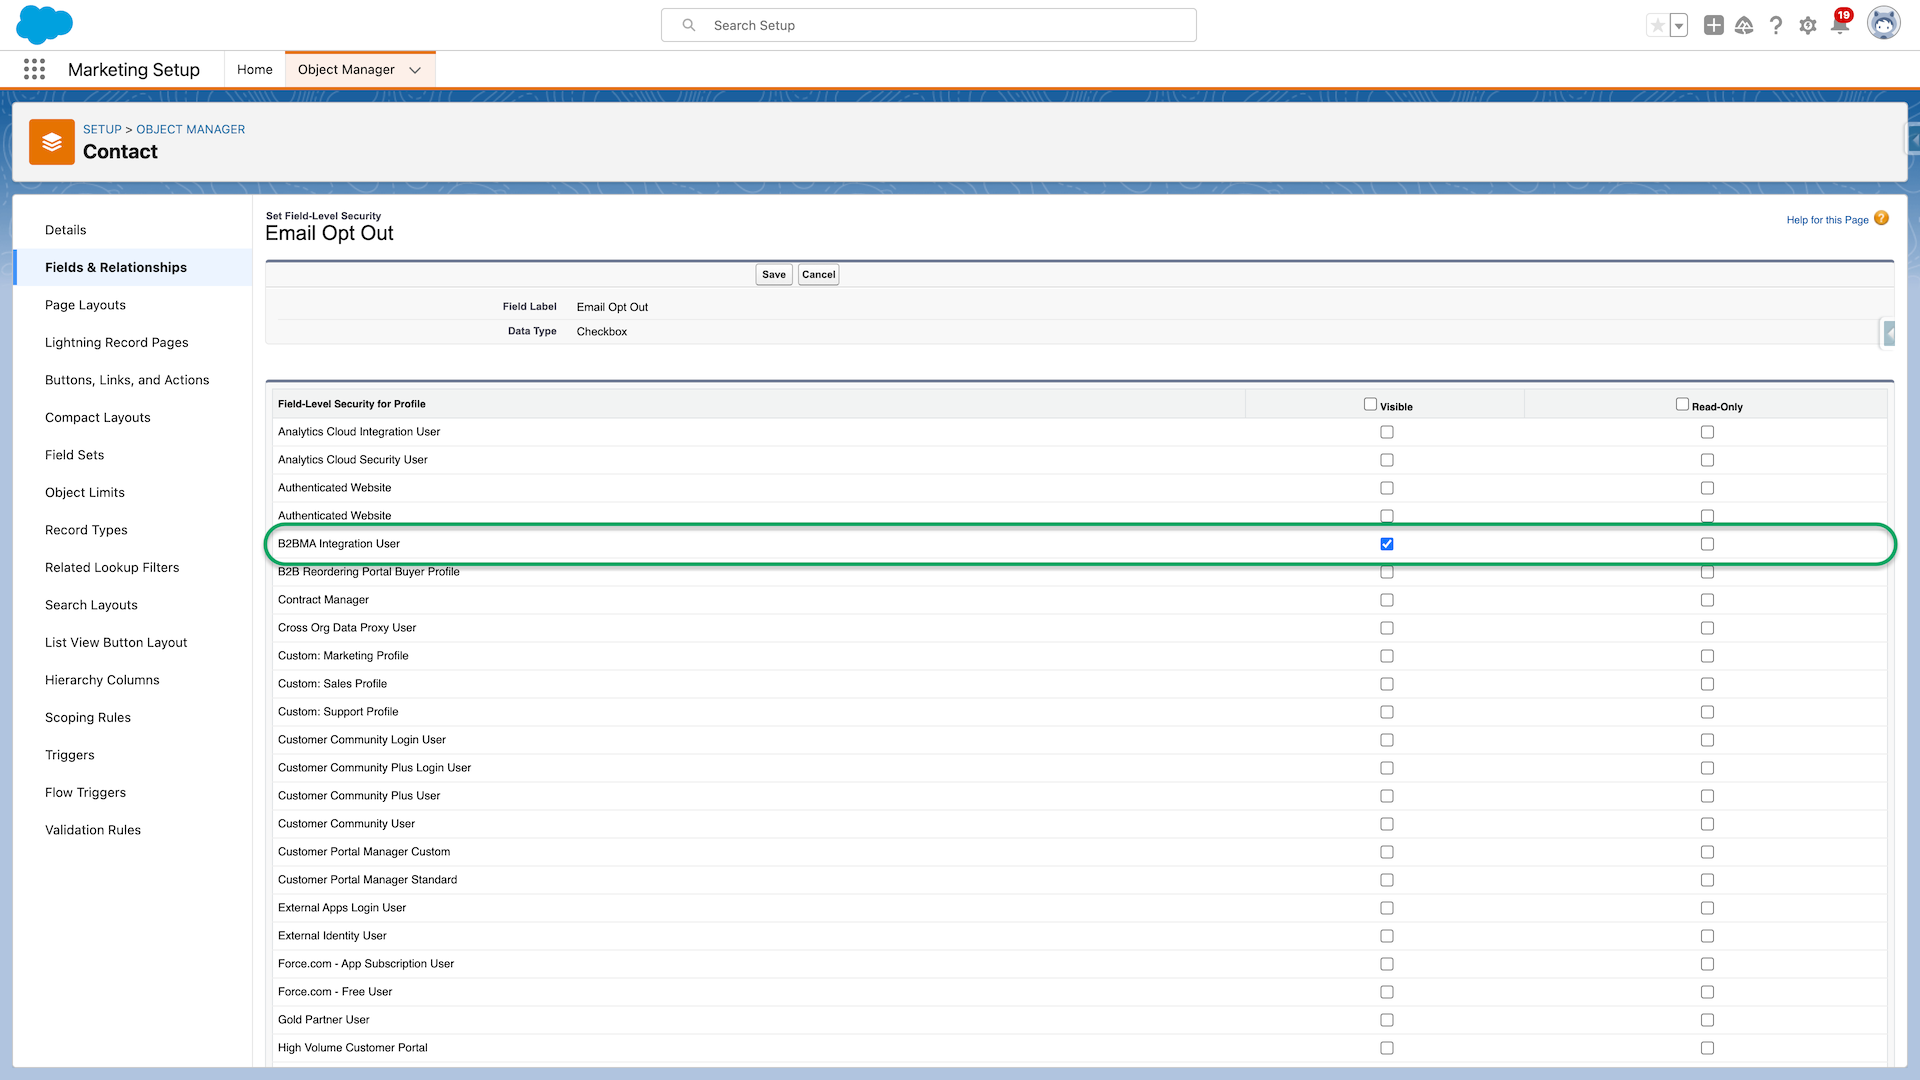
Return to the Object Manager and repeat steps 3-6 for Lead object.
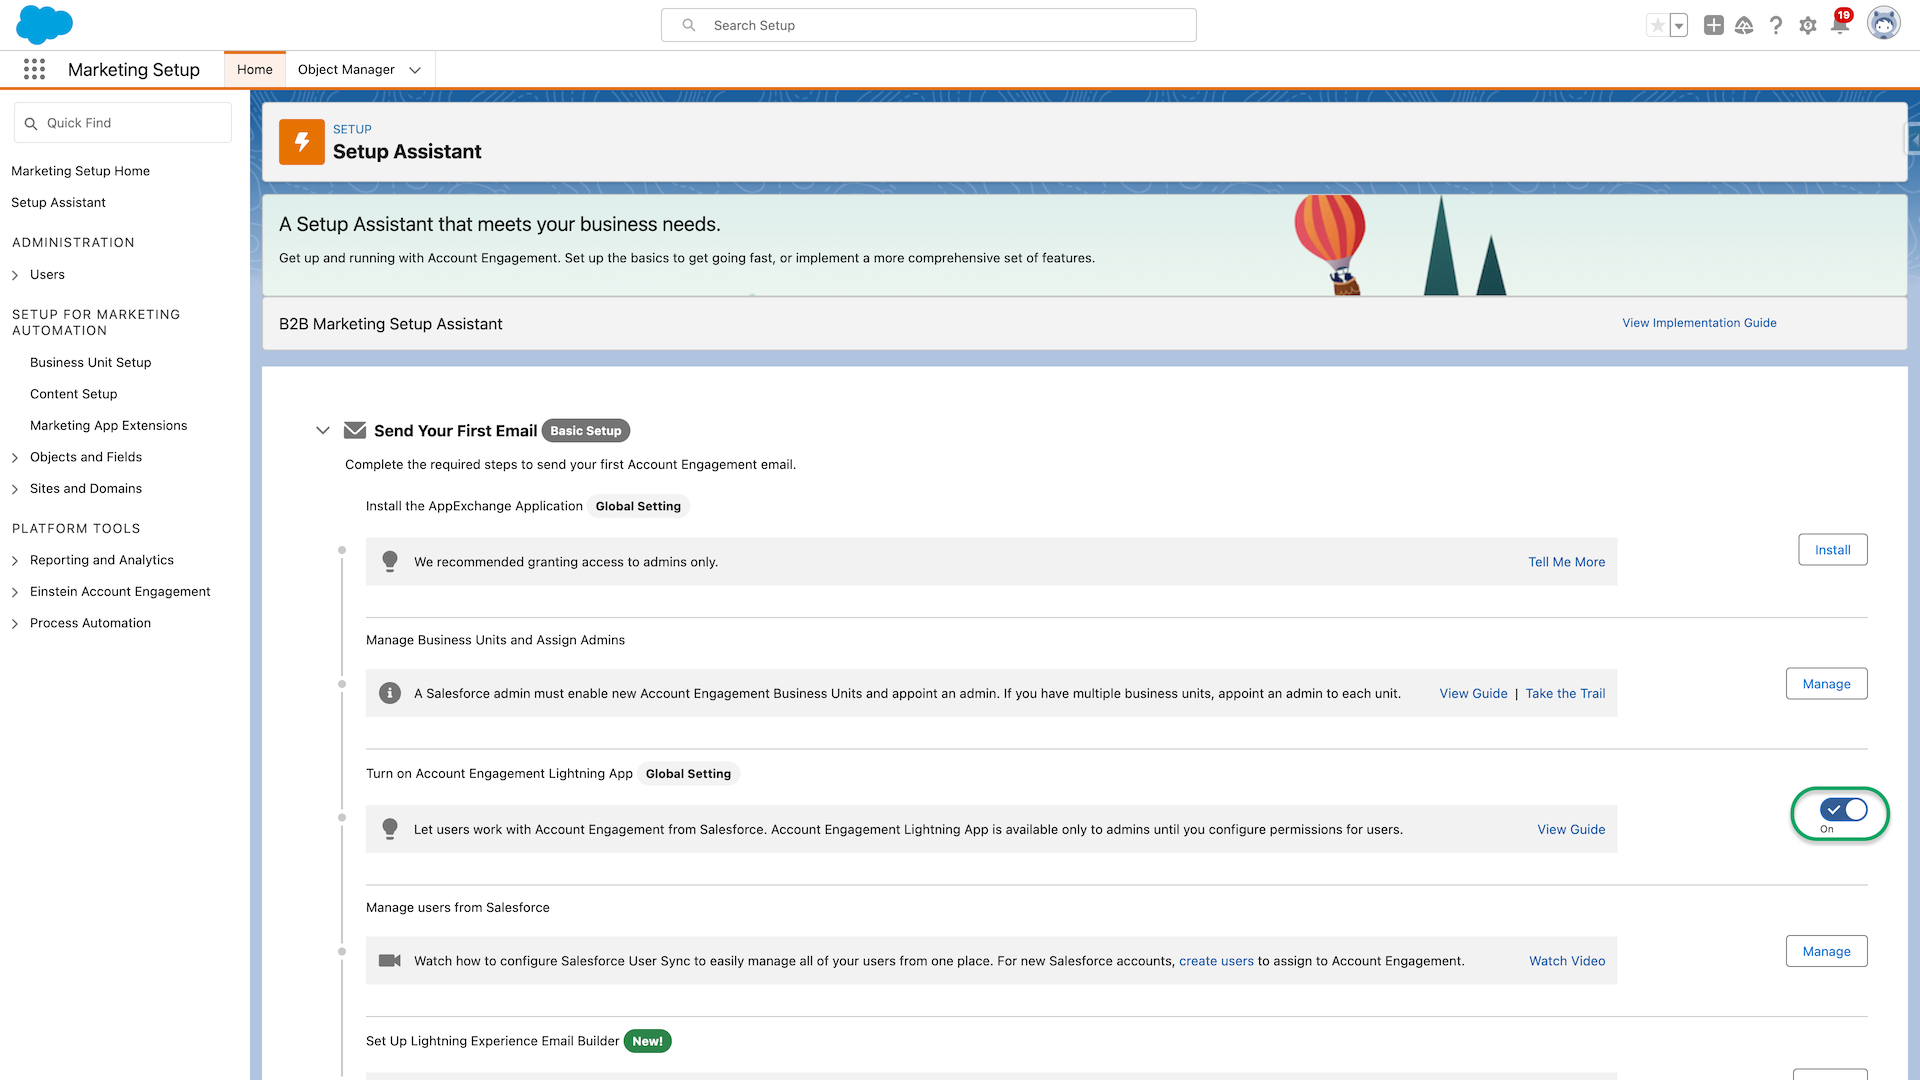
6.Enable Account Engagement Lightning App
Navigate to Marketing Setup > Setup Assistant and in the step 3 toggle the switch to enable state:
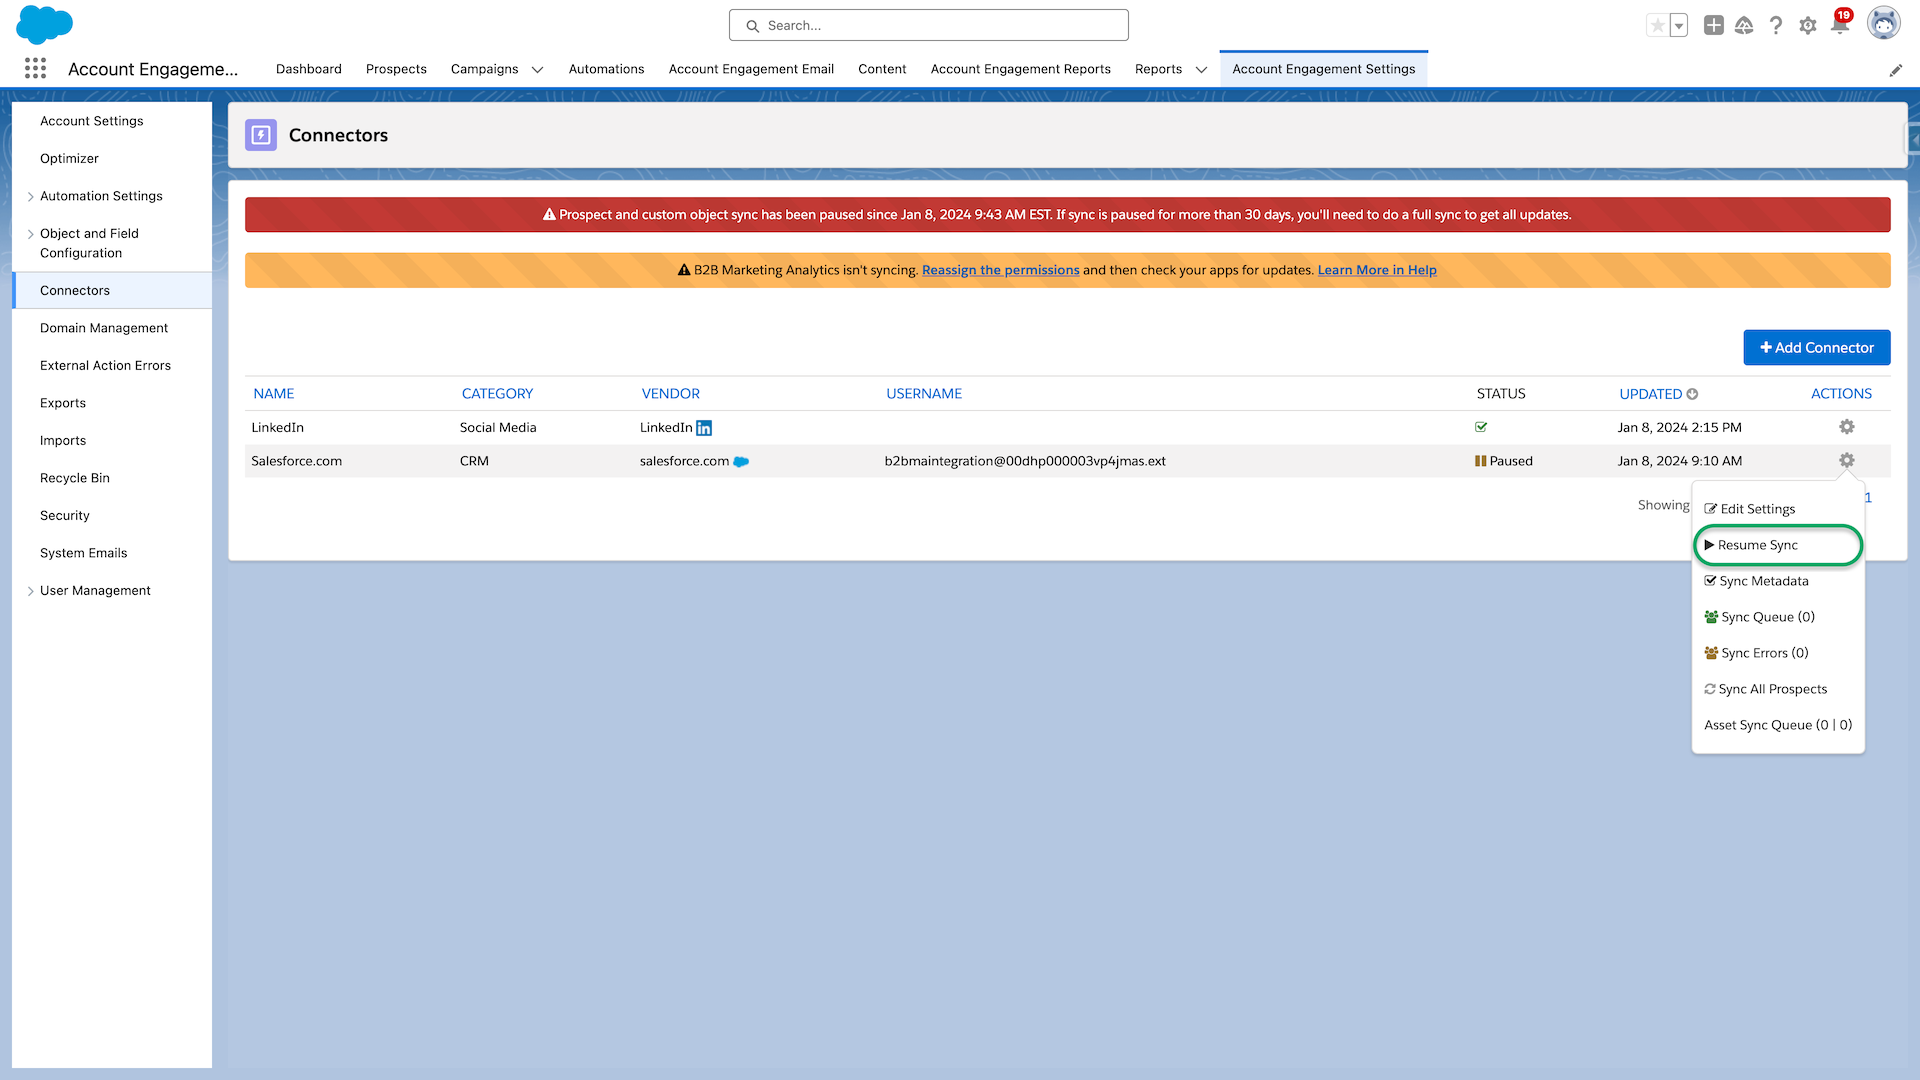
7. Unpause the Salesforce connector
Version 2 of Salesforce-Account Engagement connector is created in a paused state. An Account Engagement admin must configure the connector and unpause it to begin syncing data between Account Engagement and CRM. If it is in Verification in Progress status instead of Paused status, please wait up to an hour to complete verification, then return to unpause it.
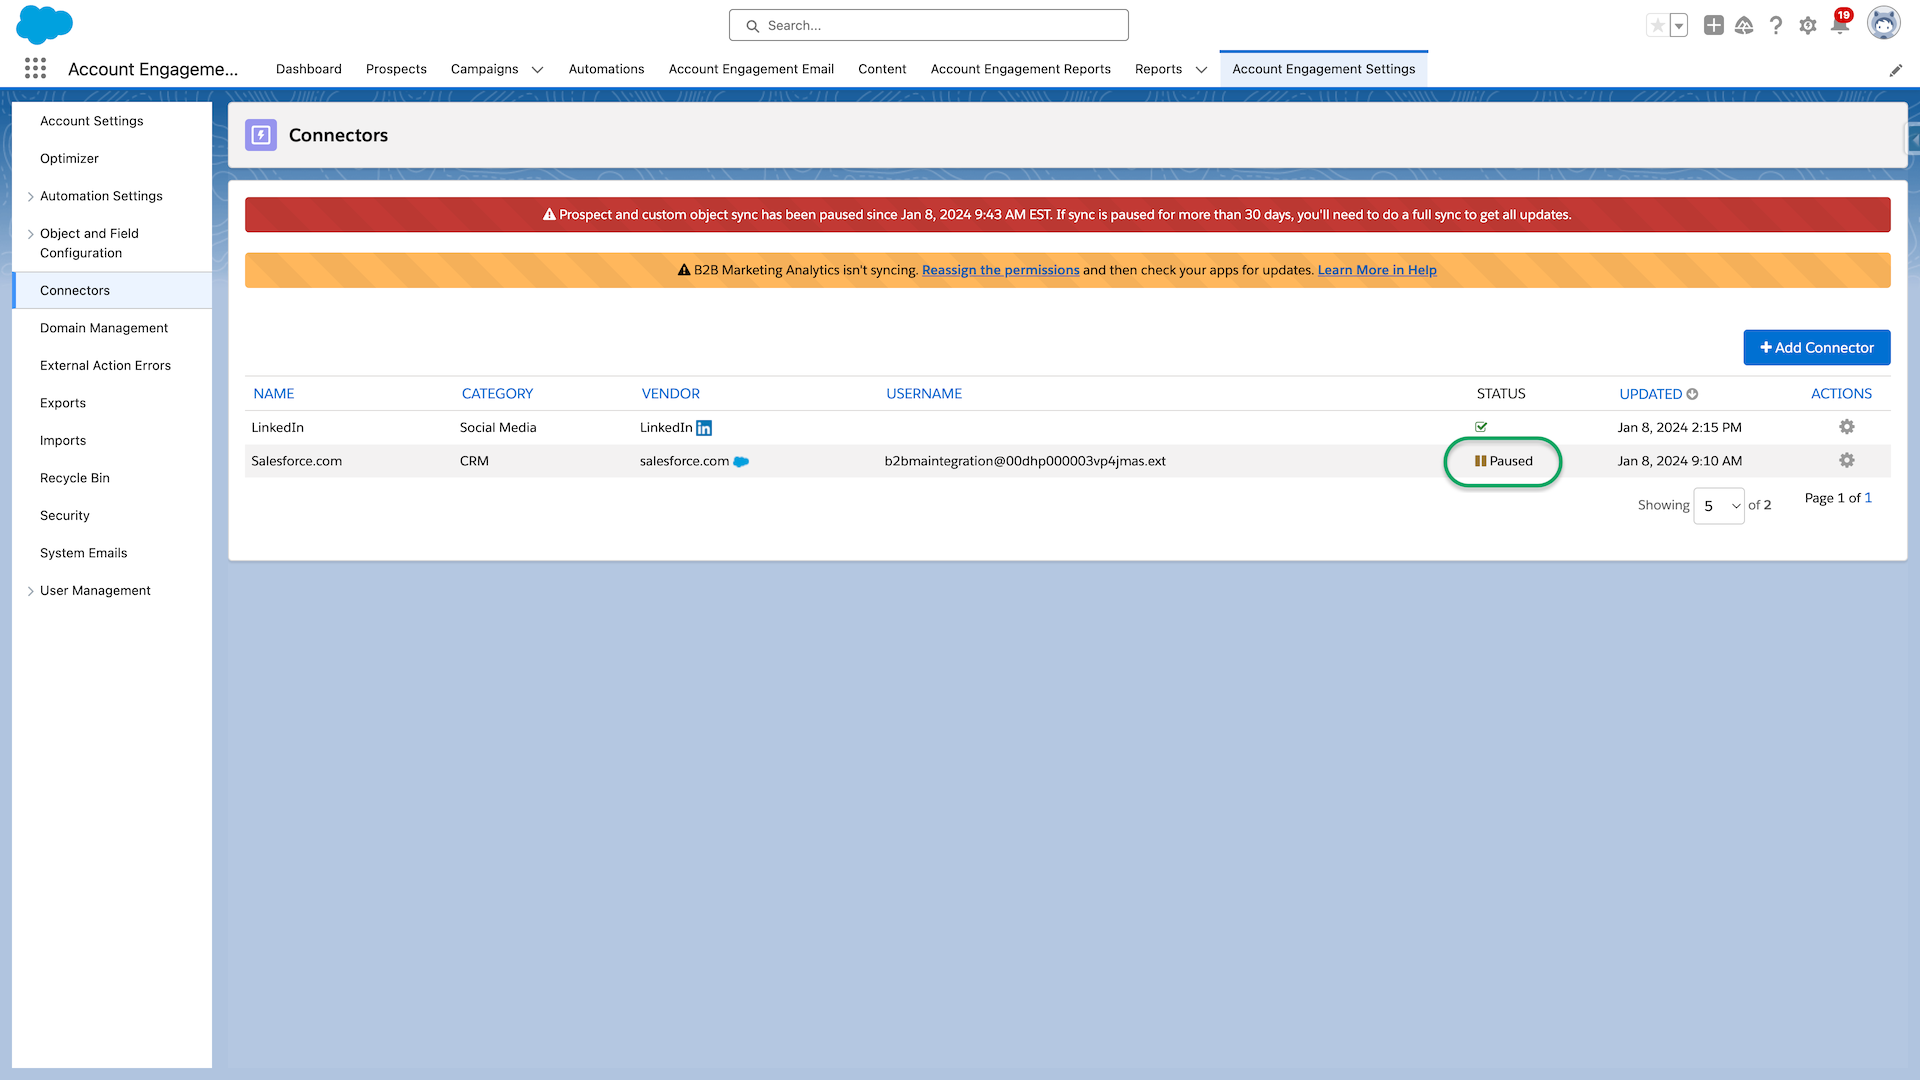
Click the gear icon next to the Salesforce Connector, and select Resume Sync.
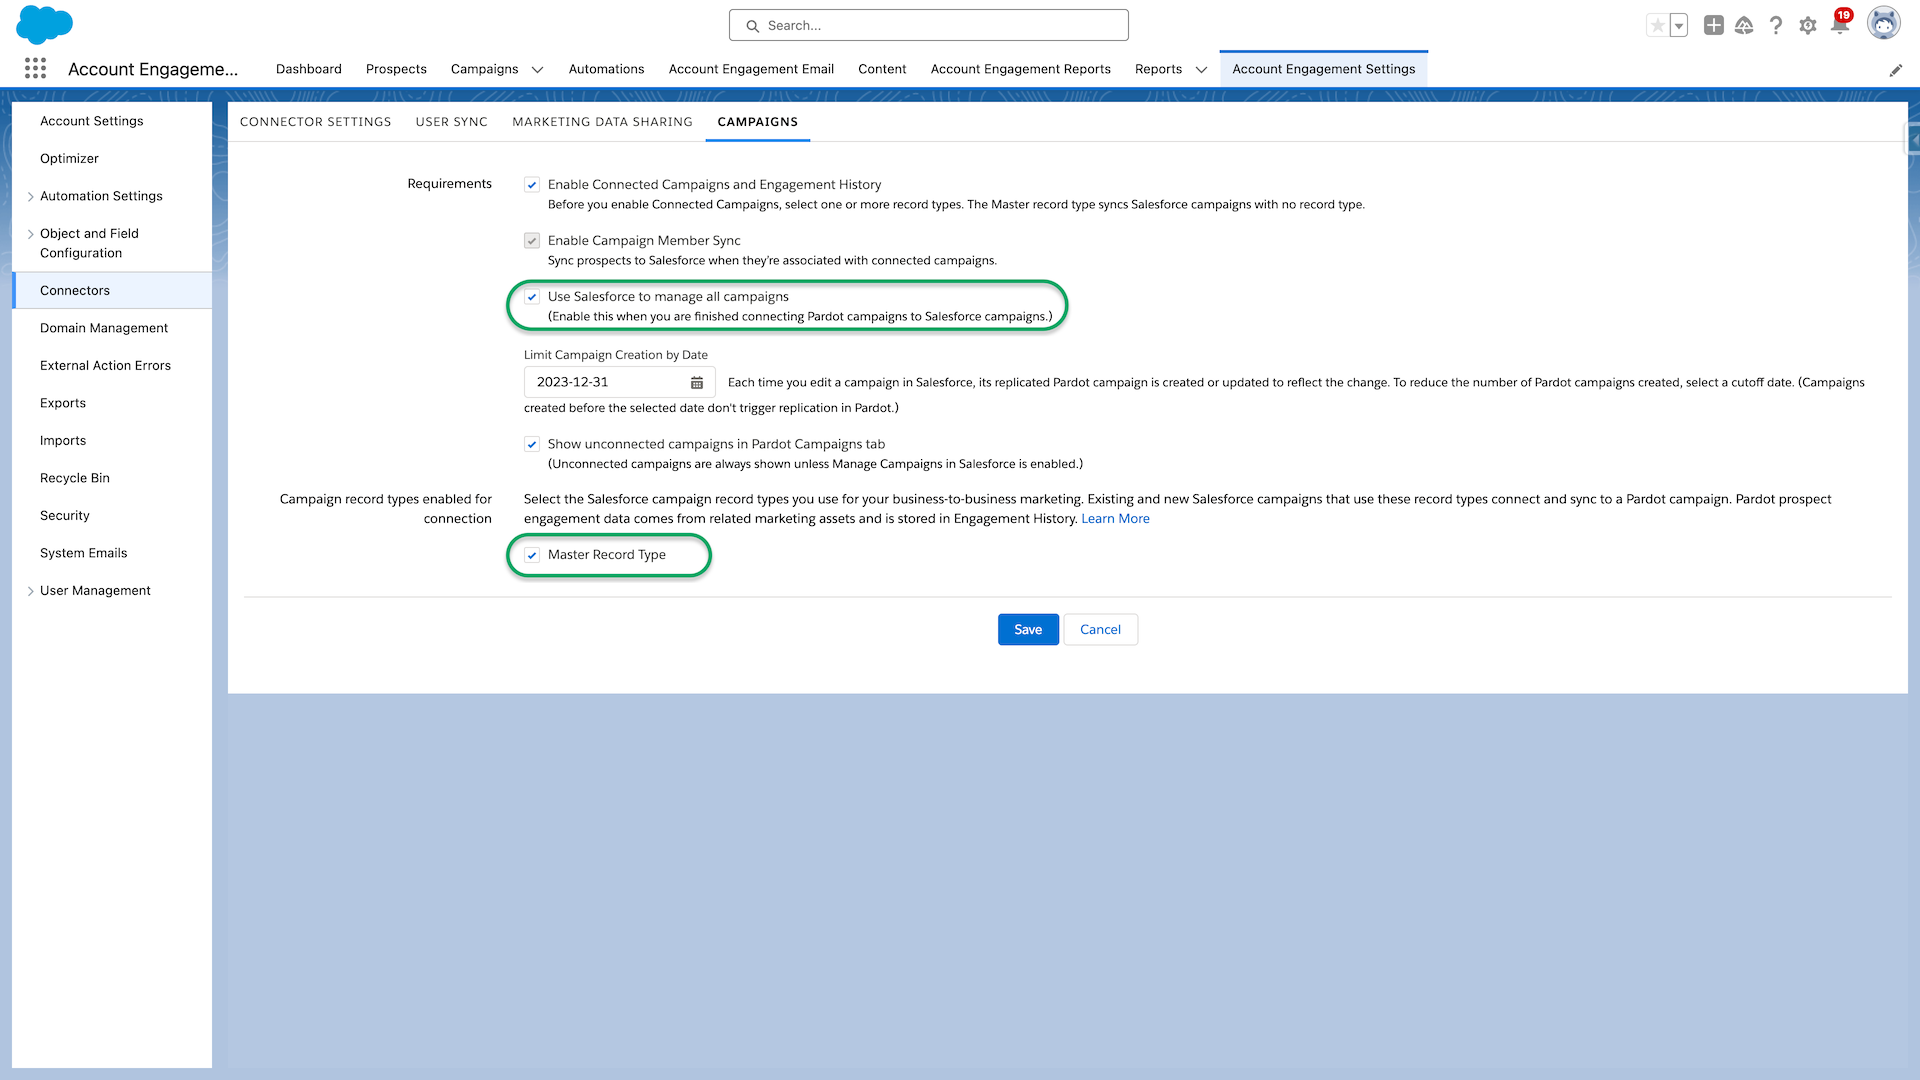
8. Enable Connected Campaigns (optional)
- Go to Account Engagement Settings and click on Connectors. Then, select Edit Settings for the Salesforce.com connector.
- Navigate to the Campaigns tab.
- Choose the Salesforce campaign record types that you want marketers to connect to in Salesforce campaigns. The master record type is the default type applied to all records before any custom record types are created.
- Check Use Salesforce to manage all campaigns.
- Click Save.
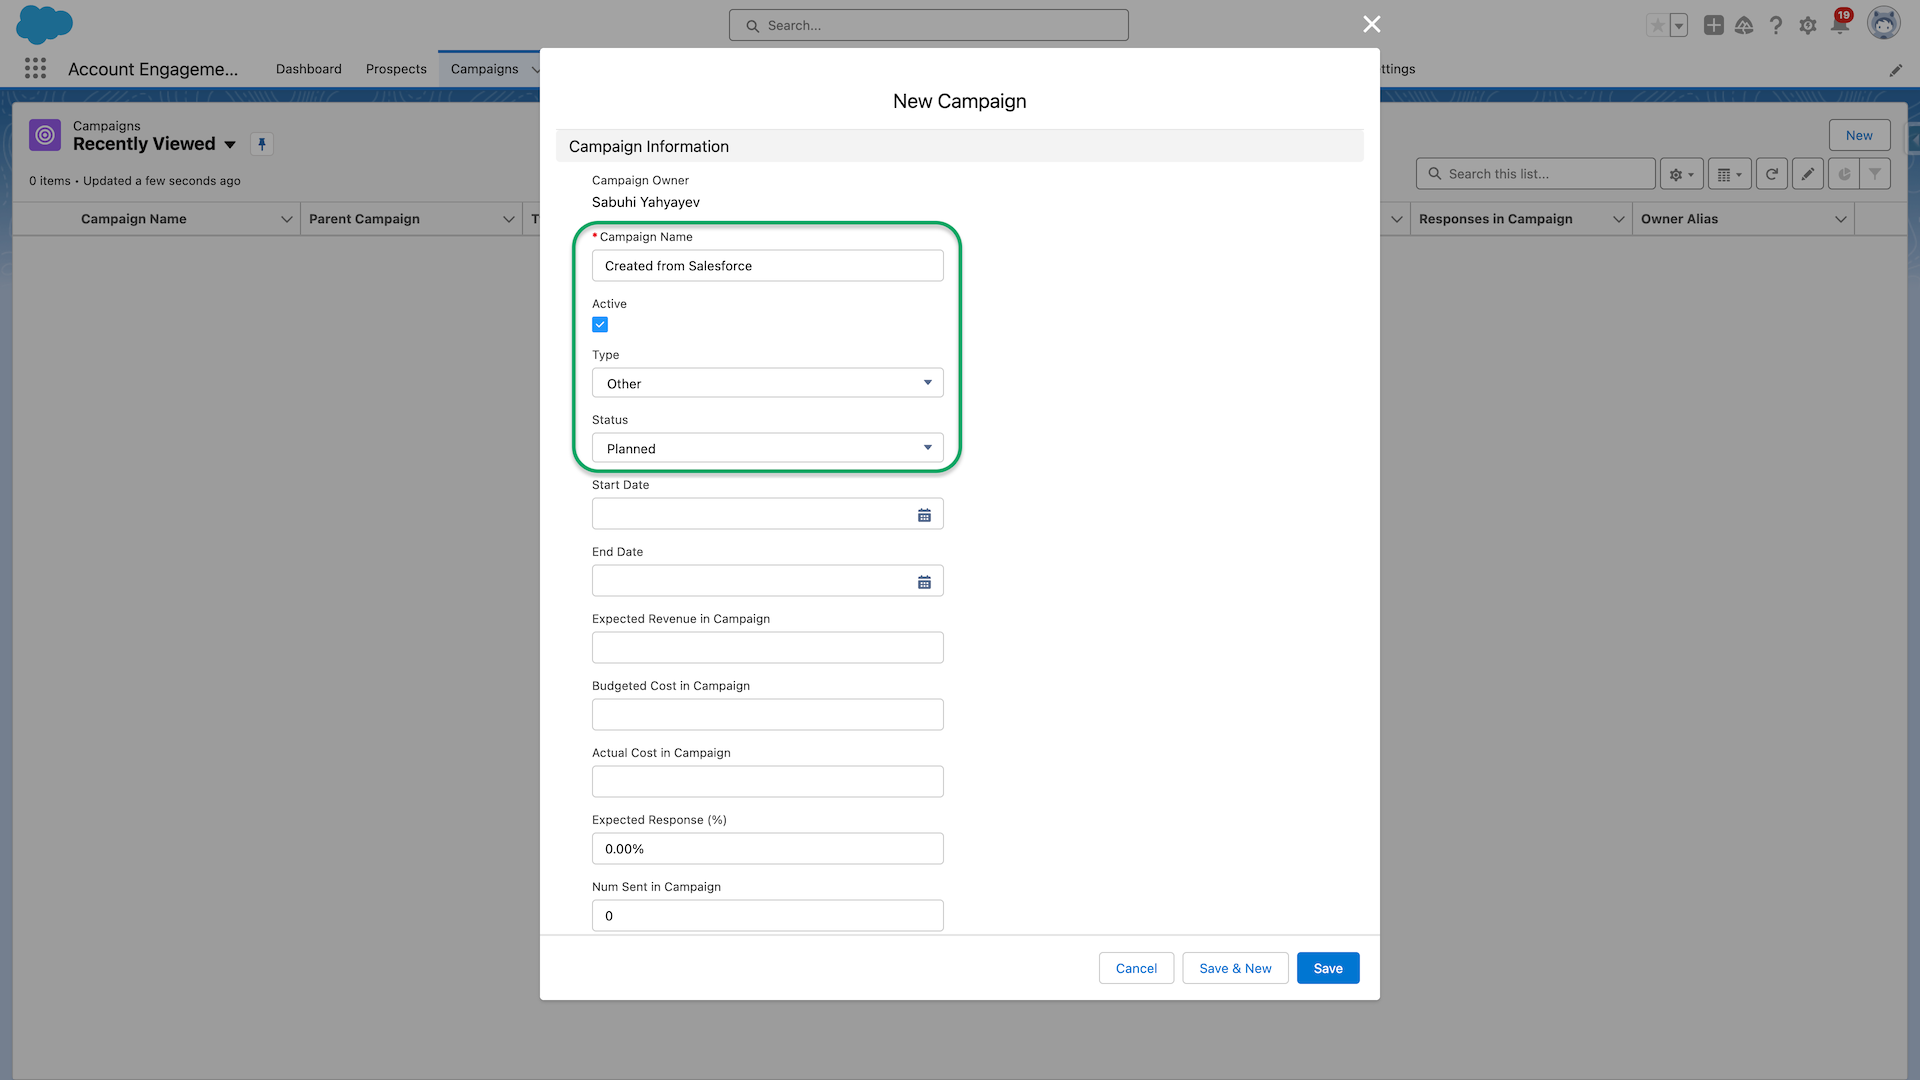
Next, you need to create two new campaigns. This step is necessary because each asset needs to be attached to a campaign. You can name your two new campaigns as “Created from Salesforce” and “Account Engagement Evergreen”.
To create the campaigns, follow these steps:
- Navigate to the Campaigns tab and click on New.
- Provide a name for each campaign.
- Ensure that the Active box is checked.
- Select Other as the Campaign Type.
- Click on Save and wait for 4-5 minutes for the campaigns to become visible in Account Engagement.
Troubleshooting
- I am able to access the Account Engagement Lightning App, but the screen shows a loading icon. Please refer to this Help Article for assistance.
- The Salesforce-Account Engagement Connector is stuck at ‘Verification in Progress’. For more information, please check this Help Article.
- When using the Account Engagement Lightning App, I cannot see all the tabs in the top navigation bar. Please consult this Help Article for guidance.
- I am unable to add a new campaign in Salesforce following the instructions provided above. Please refer to this Help Article.
Disclaimer: The content on this page is based on an earlier version of the deployment guide created by Lindsey Mark.